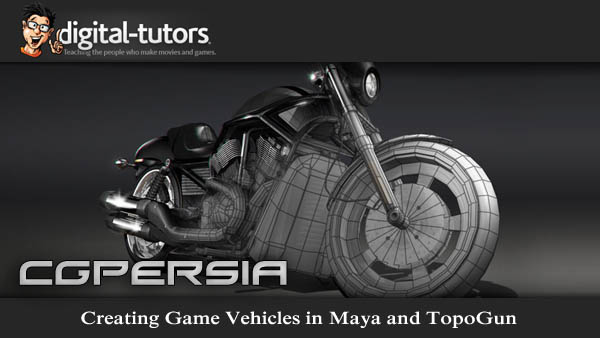
Intermediate | 5h 10m | 1.96 GB | Project Files 6 MB | Required Software: Maya 2012
Continue Reading

Intermediate | 5h 10m | 1.96 GB | Project Files 6 MB | Required Software: Maya 2012
Continue Reading

Digital-Tutors – Object Tracking in MatchMover and After Effects CS5
FileSonic -,- Filepost -,- FileServe -,- Torrent
 Digital-Tutors – Using Texture to Enhance Digital Paintings in Photoshop CS5
Intermediate | 1h 33m | 737 MB | Project Files 281 MB | Required Software: Photoshop CS5
In this tutorial we will learn several different techniques for adding texture to our digital paintings in Photoshop. Texture and surface detail is one area that is often overlooked by digital painters. By strategically implementing texture in your digital paintings, you can not only raise the quality of the image but also the level of realism. With this course we?ll get started by diving into Photoshop?s brushes. We?ll learn how we can create and configure our own custom brushes to paint texture. From here we?ll learn how to create our own patterns and several of the areas where these patterns can be utilized. Next we?ll look at some ways that we can bring images into our paintings, layering them over areas to create texture with the help of blend modes. Finally, we?ll learn a few methods of making our two dimensional textures appear to wrap around the three dimensional forms of our painting. After completing this course, you?ll be well equipped to begin experimenting with texture in your own digital paintings.
Home:
http://www.digitaltutors.com/11/training.php?pid=620
Download:
http://bytesbox.com/!/n7aDZtu8xUu63T0/
http://bytesbox.com/!/eFTiTgHrBtKibWI/
http://bytesbox.com/!/aGm6ahAdwD3DU9k/
http://bytesbox.com/!/pfV0g8cd6vRZFik/
http://bytesbox.com/!/CzKnWt3YXUYXhSp/
http://bytesbox.com/!/iWJuU86r8s6lR92/
http://bytesbox.com/!/685Cp5ZXA05aNJO/
http://bytesbox.com/!/Kq4v2WCyWYMTlxz/

http://ul.to/folder/agphri
 Digital-Tutors – Creating Stylized Female Character Concepts in Photoshop CS5
Intermediate | 3h 42m | 983 MB | Project Files 107 MB | Required Software: Photoshop CS5
In this tutorial we will learn about a workflow that can be used to design stylized female characters with Photoshop CS5. We?ll get started by learning about a few things that should be considered for every character we design. Here we will discuss the importance of things like character intent, character back story as well as references. Once our direction has been established, we?ll jump in and spend some time doing concept sketches. After our initial character design has been settled upon, we will move on and begin exploring our character by rendering them in different poses. To wrap the tutorial up, we?ll learn about techniques that can be used to create inked line-work as well as cell shaded color for our character. After completing this tutorial, you?ll be familiar with a workflow that can be used to develop stylized characters in Photoshop.
Home:
http://www.digitaltutors.com/11/training.php?pid=610
Download:
http://bytesbox.com/!/mtqHjQWh2LAZxQd/
http://bytesbox.com/!/ZmPhwYYl9viyfXy/
http://bytesbox.com/!/wiyROxlJCC3IK0O/
http://bytesbox.com/!/oiiHOrGHECkpCVo/
http://bytesbox.com/!/f7sOXaf6FuTU9BY/
http://bytesbox.com/!/8CpWyEPrp32Uh5e/
http://bytesbox.com/!/b8v0vQLdMqClSTg/
http://bytesbox.com/!/9mrG1zhCCdGhEav/
http://bytesbox.com/!/OLORrCt5u53cgsx/
http://bytesbox.com/!/dyQTb3RF6gkVKjP/
http://ul.to/folder/uxhwip
 Digital-Tutors – Modeling a Character for Rigging and Animation in Softimage
Intermediate | 3h 09m | 1.08 GB | Project Files 3 MB | Required Software: Softimage 2010
In this series of lessons, we will learn how Softimage can be used to model an appealing, cartoony character in a way that allows for a wide range of movement and emotions when animating. When rigging and animating, it’s always nice to have an appealing character to work with. In these lessons, we’ll cover the building of a simple character with emotive eyes and eyebrows which you can then rig and animate. We will look at methods for building the head, body, arms, and legs and methods for connecting them all together. During the modeling process, we will emphasize the use of proper topology and discuss how topology and edge flow can impact the outcome of the rigging and animation process.
Home:
http://www.digitaltutors.com/11/training.php?pid=322
Download:
http://bytesbox.com/!/XEtsDG6it5OhsyZ/
http://bytesbox.com/!/i0IyOEnhbQr0MUK/
http://bytesbox.com/!/ynNPeIywvKsQEwM/
http://bytesbox.com/!/kRhyGWmK3qHTEJH/
http://bytesbox.com/!/Tv81u9UxwuTUDYw/
 Digital-Tutors – Reusing Control Rigs in Maya
Intermediate | 3h 40m | 1.76 GB | Project Files 49 MB | Required Software: Autodesk Maya 2012
In this Maya tutorial, you will learn techniques for reusing control rigs in Maya to work more efficiently. Throughout the tutorial you will learn techniques for re-purposing rigs to save time in your character setup pipeline. We’ll start by merging a completed rig into our character’s scene. At that point, we will start modifying the rig to match the proportions of our character. Moving on from there, we will then add controls that are necessary to accommodate any new accessories that require controls. We’ll also learn techniques for rigging hair and belts, and use Mel scripts, to help us to cut time on repetitive tasks. By the end of this tutorial, you’ll learn how to reuse your own rigged assets, to, in the end, be more productive to your team.
Home:
http://www.digitaltutors.com/11/training.php?pid=597
Download:
http://bytesbox.com/!/HFVPqRDzZfvojlR/
http://bytesbox.com/!/JU7aJ65FJVAaeaJ/
http://bytesbox.com/!/Clh8EKazUmTyaJJ/
http://bytesbox.com/!/WIb0k7Ru13d9QL9/
http://bytesbox.com/!/lzLDAzxWpkVLgqQ/
http://bytesbox.com/!/Ux2J6N0LBkgrFyT/
http://bytesbox.com/!/mLc86UekBjA40dw/
http://bytesbox.com/!/A4LDG8ffcKUn8dH/
http://ul.to/folder/ejakkz
 Digital-Tutors – Creative Development: Using HDR Images for 3D Lighting in Maya with Jon Tojek
Advanced | 2h 27m | 1.03 GB | Project Files 458 MB | Required Software: Maya 2012, Nuke 6.3v1, Photoshop CS5, PTGui v9.0
This tutorial is a guide to using HDR panoramic images for lighting with Maya and mental ray. Throughout the tutorial, we’ll cover all of the hidden details that are needed to use HDR imagery for lighting in Maya. We’ll start with physically based lighting, world scene scale, color management, proper render preview and verification of valid floating point linear color images. Once the rules for using HDR images are clearly laid out, we will take a look at how you can create your own HDR images at home using a DSLR camera, tripod, nodal head and software. Lastly, we’ll go over examples of using and editing these images for a variety of indoor and outdoor lighting situations as well as covering light extraction and making HDR kooks from an HDR photo of a light.
Home:
http://www.digitaltutors.com/11/training.php?pid=599
Download:
http://bytesbox.com/!/4OdOcexQDjM0vJJ/
http://bytesbox.com/!/rJYth9D0IehcwZA/
http://bytesbox.com/!/MsLGPu8gkD41zKe/
http://bytesbox.com/!/VlwOEx5y70SaqOV/
http://bytesbox.com/!/DBCcgkxvcl1ffnb/
http://bytesbox.com/!/kL7b2IGMmoJeM1j/
http://bytesbox.com/!/F5sfCqafFwbWVpV/
http://bytesbox.com/!/F7XQrENms0XPfiB/
http://bytesbox.com/!/stkJjpsTWafQSLB/
http://bytesbox.com/!/c6AIO299PQtjzbI/
http://bytesbox.com/!/RLWw5u398bVLx8L/
http://ul.to/folder/i8z65s
 Digital-Tutors – Creative Development: Photorealistic Time-Lapse Animation and Rendering in Maya and modo with Martin Mayer
Advanced | 2h 38m | 1.25 GB | Project Files 466 MB | Required Software: Maya 2012, modo 501, Fusion 6.3, ZBrush 4R2
In this tutorial we will learn the efficient use of tools and techniques for creation of a time-lapse video. Throughout these lessons we’ll delve into the animated growth of a tree branch as a time-lapse video. We’ll learn everything from modeling, texturing and shading to the animation and final compositing. By the end of this tutorial, you’ll have a better understanding of how you can employ efficient and productive techniques for a time-lapse video that can be used when up against a tight deadline.
Home:
http://www.digitaltutors.com/11/training.php?pid=616
Download:
http://bytesbox.com/!/jb5XBcAAsdptKwt/
http://bytesbox.com/!/BeTtXXBO7iIpfE8/
http://bytesbox.com/!/fbpPGLJMsEBmClX/
http://bytesbox.com/!/giO2nD1uHKGoa0X/
http://bytesbox.com/!/mhoG18fZuFWLDz4/
http://bytesbox.com/!/jnFHjKsYDt7tQ3n/
http://ul.to/folder/tb51e1
 Digital-Tutors – Animation Retargeting Techniques in Maya
Intermediate | 1h 15m | 474 MB | Project Files 80 MB | Required Software: Autodesk Maya 2012
In this set of Maya tutorials you will learn a variety of techniques for retargeting animation to save time building animation assets. We’ll start by learning how Maya’s Trax Editor can be used to retarget animation. We’ll then take another approach and utilize MEL to accomplish the same thing. Finally, we’ll work with Maya’s intuitive Human IK toolset to retarget from a performance-captured animation to a custom skeleton. We’ll also cover techniques for optimizing and correcting animation after it has been remapped. By the end of this set of tutorials, you will be familiar with several tools you have at your disposal for re-purposing animation, to, ultimately, save production time.
Home: http://www.digitaltutors.com/11/training.php?pid=602
Download:
http://bytesbox.com/!/oDyec4ReuA7hMin/
http://bytesbox.com/!/3pn2th6YSjzCgxR/
http://bytesbox.com/!/GvaAxDoRsSK9Rwa/
http://bytesbox.com/!/O2sSBVi6b1Eu6o9/
http://bytesbox.com/!/5Uy19MnXJM8AoCb/
http://ul.to/folder/mvw2zq